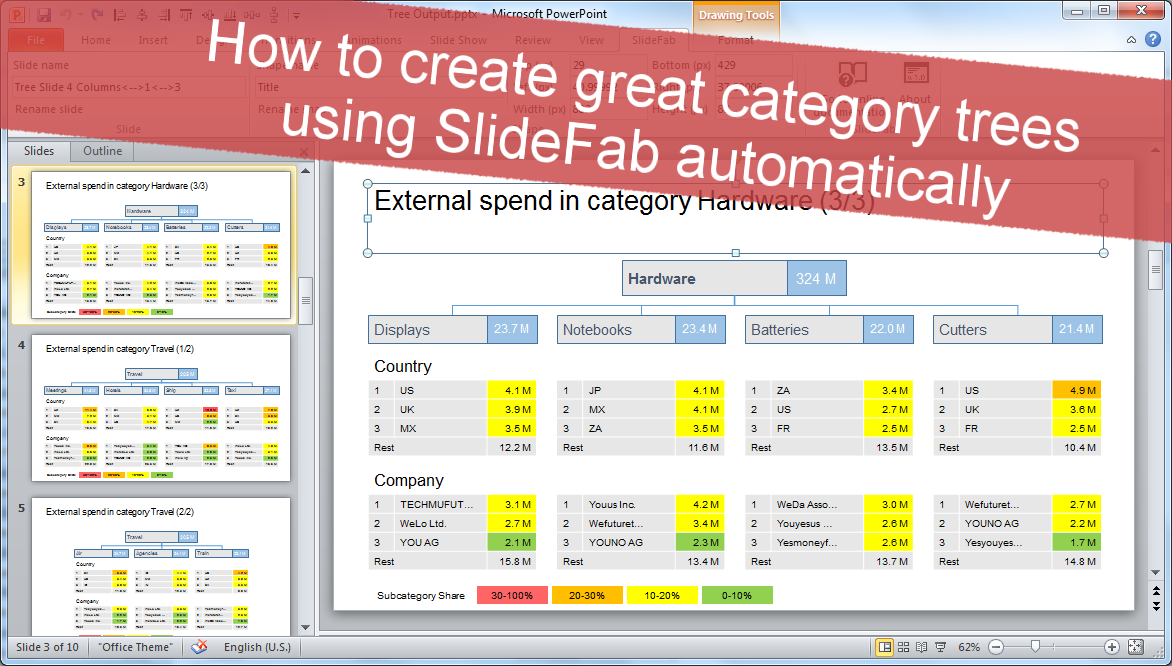
This SlideFab video shows how to create Category Trees automatically. A Category Tree is a structured visualization of corporate spend. It serves for quickly showing where most money goes in terms of categories, sub categories, suppliers and countries.
UPDATE September 9th, 2022. This example still uses a VBA macro to filter the pivot table. With SlideFab v7.0 the VBA macros can be substituted with the pivot field filtering function.
This example uses various advanced SlideFab features: E.g. slide loops, slide sort order and VBA code calls for creating Category Trees. It visualizes category spend and puts each category on one or more tree slides, where the branches resemble sub category spend. Each sub category will give an overview of the top 3 suppliers and top 3 countries by spend. The Powerpoint to Excel automation then creates the slides automatically within minutes. This helps to speed up creating such trees by an enormous factor.
Comment on the Excel model
From an Excel perspective this example is rather advanced. Functions like INDEX/Match and Pivot Tables help to prepare data for SlideFab. Complexity comes also into play as this model flexibly decides the right number of columns. It avoids printing 4 columns + 1 column slides for the last 5 branches. Instead it prefers 3 columns + 2 columns slides instead for a nicer visual appearance (the setting for this is in the help worksheet in the example).
Besides, writing custom code to automate this task using VBA would take a serious developer a couple of days. It is conceivable to create slides with these Category Trees manually of course, but the breakeven where SlideFab is faster will be reached very soon. And then manually copy/pasting would be a mere waste of time.
Feel free to start right now
Here you will also find the Excel workbook and Powerpoint presentation file as download. You can try it out with SlideFab right away. The files are prepared already: The Excel workbook is ready to use. The Powerpoint presentation contains all settings made in the video. To run this example, get your free trial license, install and activate SlideFab. Then unzip the example file. Open up the template Powerpoint presentation pptx and open up the Excel file as shown in the video. Then slide making can be started right away.
Feel free to use this example Excel as a template for your own SlideFab automation. You can just put in your own data. Or you can get inspired on how to structure and write such kind of Excel model. Especially, if you like these Excel formulas, feel free to use them in your own models as well. As a personal comment: Whenever possible use Excel tables. They can do much more than just offering formatting (e.g. look at the readability of the formulas and how SlideFab supports these tables out of the box).